Wednesday 10 April 2013

Autumn

I found myself a hardtop from a guy in Västerås. It is in good nick but needed new rubber seals. Thanks to my English connections I manage to get the address to an English company dealing in Rubber Extrusions and they had a seal that could be used between the hardtop and the car body. I got the seal between the hardtop and the front window from MASC (Midget and Sprite Club).


I had already got the side windows but they had to be refurbished. The frames was sanded down and polished. One new bracket had to be fabricated. I had earlier ordered the rubber sealing’s from MOSS UK together with the felt seal for the sliding pans.


The windows were both broken and milky but could be used as templates. My local glaciers fixed new ones. In the end they became very good and functional!


However…… it still looks best without the hardtop!!

Friday 15 March 2013

Work done during the summer

 
Now I was able to drive the car but that did not mean that my work was over.  I have no weather protection at all. I have a tonneau, soft top and a hard top but none of them were ready to go onto the car.

A decision was taken to fix the tonneau first.
There were no fasteners at the front so I had to measure and drill so I could mount the pegs.
 
 
Next step was to fix the tonneau so everything fitted lenght- and sidewise, one problem was to get the cuts for the door to fit properly.


I was helped in my work by our cat TLC, Tender Loving Cat (called Elsie (LC)) when it comes to check the inside looks.
 
I am happy with the result, at least I now have a basic protection against rain and bad weather even if it is only when the car is parked.

Monday 4 March 2013

Spring 2012

I only drove the car a little in the summer of 2011 after the MoT. One of the reasons was the weather but also that there were some minor problems that I wanted to fix. So mostly short shake down trips.

One problem still not solved is faulty petrol reading, the lack of correct information is the reason I got some extra exercise after running out of petrol.  Luckily it was not far from home so after a walk, that included filling a jerry can, it was running again. The fuel sender is the prime suspect for this faulty reading.


Monday 18 February 2013

MoT!!!

In June 2011, for the first time, I drove the car on public roads on my way to the MoT.

In perfect top down weather, at 08:40, I entered the MoT hall. The tester was happy and enthusiastic to get an unusual car to test instead of all euroboxes. Everything went well and he took a looooong test drive before I got an empty certificate.
After passing the test I could drive home enjoying the weather and plan for new trips. This was the first time since 1973 that the car was road legal!

Monday 4 February 2013

More to do before the MoT.

Other projects occupied my time during the winter 2011/2012. When spring started to make itself seen, it was time to check the car over before the MoT. I also booked an MoT time to put some pressure on myself to get everything ready.

The first thing I did was to fix the interior. I put in/on new carpets, windscreen wipers, gear lever rubber gaiter and more small details.


Engine bay, no air filter attached. I still had not tuned the carburettors. That took some time because of my inexperience in this field. I hope that I got it right.
 
Ready for the MoT!

Friday 25 January 2013

To get the car back into the register.

I had to get the car back into the national car register again. Step one was to track down the old papers on the car, send a copy of them and an application form to the proper authorities; the Swedish Transport Agency.
After their approval I had to make an appointment with one of the MoT stations that can handle a register inspection.
The 1 of October 2010 after loading the car on a trailer, me and a friend went to the city of Vara, 30 minutes’ drive south. The car had to be on a trailer because I still did not have any license plates, insurance and valid MoT.


The excitement mounting every minute, will I succeed in get the car back on the road?
 
 
The inspector pulled, yanked, poked and hummed, after that a short test drive.
 

And…..all went well!!!!!

The car past and I was to be issued a new license plate. It did also pass its MoT, however I could not get a MoT certificate because the computer system refused to acknowledge my chassis number, it was to short according to today’s standards! It had to be done manually at the Transport Agency Office, so paper had to be filled and sent to fix this and that meant I could not get the MoT certificate because the test was done before the car was back in the database.....

It did not really matter that much because the driving season was more or less over, for open cars, where I live.
 
However a BIG STEP had been taken to get the car back on to the road again!!


Wednesday 14 December 2011

Wiper Motor

When I started to check that everything electric really worked I found some unexpected things. Turning on the wipers and the wiper motor started but the wipers did not move!

That was unexpected because the motor was new (NOS) and I had just taken it out of its package and installed it.

I started to check and when I unscrewed the top of the motor I saw why it did not work. The complete package to make the wipers move was missing, the motor was just....a motor!

Luckily one of my connections had the missing parts and after a few days a package arrived from Holland and after everything was installed it worked........almost worked......


The empty motor…..

It turned out that the wipers went the wrong way. They where setup for a RHD car.  Hopefully it can be fixed by rewiring the electric connects.


Tuesday 29 November 2011

Electricity…cables and some smoke…….

Next step was to check that all electric equipment worked. I bought a battery and connected it, the connection was done after that I checked everything that uses electricity was turned off!
The plan was to start up one thing after another and check that it worked. The first thing I turned on was the lights...........and a gigantic cloud of smoke appeared from under the instrument panel!
I turned off all electricity, disconnected the battery and opened up all doors to the garage to clear the smoke. Then it was time for a cup of tea, untill the smoke had cleared and my nerves calmed down.

Then it was time to assess the situation. Burnt cables under the instrument panel belonging to the instrument lights were found. Further investigation reveled crossed instrument cables. Not a major disaster, not even a minor one.

After disconnection of these cables I started to test again. First the lights…. It worked!!!
Then the next function and so on and all worked......well almost everything worked.
....to be continued......

Tuesday 15 November 2011

Interior Trim

After I got my instrument panel and the steering wheel in place I started work on my interior trim. I had the old door pocket panels and I used them as a template and manufactured a new pair.
This is before and after;


I brought home a Dynamo during one of my visits to England. This was one missing part that is difficult to find in Sweden. From the same guy I also got the templates for all the different interior panels. Back home I got some fiberboard used in boats (masonite) and manufactured my panels.

A local fabric store had the material to cover the panels. With use of time and contact adhesives it was fairly simple to create them. I am pleased with the result.
I hope they fit!

Friday 28 October 2011

Instrument panel

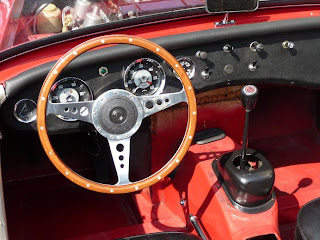
I continued work during the summer of 2010 by putting in instruments into the instrument panel and then the panel into the car. I did find the fuel gauge on the internet and it was shipped over to me from England. The correct gauge is a Jaeger but they are a little rare (=expensive) so I settled for a similar one from Smiths.
The dual gage is also a Smiths, this time a new one.
After some work with cables and all other connections everything fitted.


Cables to starter engine, rev counter and spedoo was also fixed.
As I had decided to make the car the De Lux version, I also installed a heater!

Sunday 16 October 2011

Getting and fixing Parts

Time have to be spent on refurbishing parts that is needed. The Dynamo is a little different from period standard ones. It has a mechanical reduction box for the tachometer. I have two of them but they are in pieces, broken pieces mostly, so they were not possible to use.


I got in contact with a guy in England how offered me a renovated dynamo. This offered a perfect excuse to go to London and collect it and at the same time go to West End Shows and eat fish and chips.


It was also time to start on the instrument panel. The Speedo and the Tacho was sent over to England and JDO Instrument Repairs for a check. I got them back in better shape than new!


I also mange to get a Heater Fan from a Dutch Midget aficionado.

Friday 14 October 2011

Exhaust System

After the engine got into the car I could now attach the exhaust system. I had got a new one that I put on using new brackets. The troublesome part was to fix the clamp assembly joining the pipe to the manifold. It is rather awkward position behind/under the carburettor but I managed …… eventually!


Sunday 21 November 2010

Getting the engine in place


After the engine assembly the clutch and gearbox went together. This is the result. The gearbox should have had the same colour as the engine but I decided it looked better in aluminium finish so I kept it like that.


I also “dry fitted” the manifold, heat shield, carburettors and air filters to check that all fitted together, it did!


Empty engine bay, just waiting for the engine.


So, now it was the “simple” procedure to get the engine in to its right place. I mange after some fiddling and everything fitted well.


The result was good but still all the ancillaries are missing in there before I can fire it up for the first time.

Thursday 27 November 2008

Even more Engine……


Crankshaft working fine, time for the next step. Front and back plate, oil pump, oil strainer, timing gear and chain and so on. I run into one small problem, the oil thrower! The one I had was wrong (to a newer engine) and it was not easy to find but a friend had one laying around and I got it. But it delayed me one week!


One valve was “burnt” so I had to go to Gothenburg to get a new one, after that I ground the valves in to fit the cylinder head. I have an old head and I found a “hole” where a blanking plug was supposed to be. It was, of course, missing so I had to let a professional engine company fix it.


After the sump was bolted to the engine I brought the engine down from the workbench and put it on my mobile “engine stand”.

Then I continued with the rest of the parts.
Cylinder head torked down, rocket shaft, push rods, camshaft followers and so on. Distributor put on and checked that it was not 180 degrees wrong!


After some time I had, an almost, finished engine. Still missing is the dynamo and some brackets and vacuum pipe, I think there still quite some small missing parts.

Tuesday 17 June 2008

Engine Continued

The cylinder block was painted and I started to put the engine together.

First step was the camshaft. It looked good, no marks and the bearing looked good to. Its an early engine so it only have one bearing instead of three as in later engines.

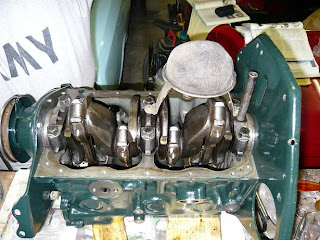
Step two, crankshaft. Bearings are ok. Everything has been cleaned and I have got new look tabs. I used a lot of engine oil when I put all the parts back.

Now it started to be interesting. When I put the bolts back on and torked them to 60 lbs/ft, will the crankshaft still move freely?
I did it in stages and checked after every stage and YES it moved perfect at maximum tork.
So far so good!!

Clutch

At last spring arrived in earnest in the year of 2008 and with it The Nossebro Autojumble. One of springs highlights!

My daily drive took me to the market early in the Saturday morning. A gray morning, ideal for an Autojumble. I had made my self a list of needed parts but did not expect any major success.
When I arrived there was already a crowd. After I’ve done half of all stalls, nothing. Well actually I had found one thing, a driver’s instruction booklet but considering it to expensive I opted to wait for this detail.

Then it happens, I saw a English flag on one of the stalls. I considered that as a god sign. What did I find, a complete clutch, new and to a very god price.

After this I now have all the parts I need to refurbish the engine, clutch and gearbox.
Now the goal is set to get this into the car this year.

So the day had been a Very Successful Day. Even the weather had changed to a warm and sunny spring day.

More about the engine

I got the engine back from the repair shop. It was cleaned up, some broken studs taken out, new bearings for the con rods and new piston rings in a box.


I started to paint the cylinder block just to get the impression of a “new” engine. I needed to shop around for some more tools for example one to compress the valve springs. Realised I needed more parts as lock tabs, cant reuse the old ones!

I have found out that it is cheaper to get my parts from England even if I include the freight cost than it is to shop in Sweden. The parts are normally the same so there is no difference in quality.


During a work trip to Stockholm I found, on the internet, a company that had sale on Tonneau Covers for a very god price. It is certainly not one of the things I need first in my restauration but the opportunity was to god to miss.

Sunday 8 June 2008

Autumn

After the summers work what were going to be the next step? The Engine!! That’s a small missing part! I had two gearboxes but an engine…… no.
Internet and car magazines where studied. Not much to choose from, at least not in Sweden. I found 1100 cc engines but not 948 cc and I wanted one of those.

Late autumn I got lucky and I found one, in parts of course.


Back home started the dismantling, it looked rather well. Spoke to the local engine workshop and realised that some work had to be done by them.
I got a cleaned and checked engine back, new con rod bearings and piston rings among other things.

Spring 2007.

When spring started to fool around outside I could not start work on the car! The roof of the house had to be fixed. New tiles and some new wood were needed to fix an old leak and thereafter work started to interfere with more important things (the car!!).

I had planned for 6 week holiday during which I got some time to work on the car. It was not the best of summers a lot of rain but with the garage door open I managed well even when it rained.


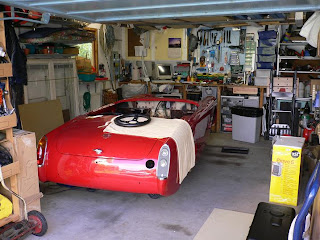
This summer I managed to get the car to stand on its own (newly refurbished) wheels. New tires where ordered. The tire company wondered what kind of trolley I was going to fit those 145-80/13 tires on. They where politely informed of the cars make and model!!

The rear axel where cleaned, painted and bolted on the car. The local blacksmith fixed one of the link rods to the handbrake, because it was to long.

Winter work

In December I and my wife decided to take a London holiday trip.

We where lucky with the weather cold but sunny. I also got the opportunity to visit MOSS. It became a daytrip where my shopping was part of general shopping and lunch.

We ended up in quite different areas than normal. MOSS used the best part of 1h 30 min to provide me whit the parts I had listed. I also gave myself a gift, a MG fleece sweater.

During the rest of the winter I continued on my inventory and sorting of parts. I had to reorganise my garage so all parts could be stored in a logical way.

During Christmas I began to put the front of the car together and started work on the brake system. Cramped as it is in my garage and cold during wintertime meant than after the left front where fixed I gave up. I continued in the basement with the carburettors.

Parts from Stockholm

I worked out a long list of missing parts. During summer 2006 I had found a guy in Stockholm area that have a lot of parts. I went there during a weekend and got a lot of parts. Some of them new some used but in god nick. I got two gearboxes from a different bloke in the same area. So that meant more parts to sort, refurbish ant put on the car.

Inventory and more stuff

At the same time as I was doing an inventory, sorting and putting everything on shelves and in boxes I tried to clean up and refurbish different parts.

I also received a good offer from MOSS saying that if you shopped for more than 150£ freight was free. I had already identified a lot of missing parts so there were no problems to fill an order sheet. I prioritised the parts belonging to the brakes, rear end and steering because I had decided to start with that.

My thought was to get the car standing on it own wheels as soon as possibly. One week later I received a box with a lot of nice shiny new bits.

I took out the steering column, cleaned and painted it installed new bushes. I was pleased with the result. Look at the picture and se of you agree.

More parts was cleaned up and painted and put on the shelves so I could just take them down and put them on the car. Everything took time and most of the work was done during the summer holiday 2006. I also bought a new petrol tank from England, I found an other company on the Internet, Sussex Classic Cars.